A common theme I hear is that you need a lot of gear to create great photos. That, of course, is untrue and I want to show you a simple example of how to create awesome dramatic photos with only window lighting from a single window in a dark room. All these images were shot on my trusty Sony A7 mirrorless camera with a Sony/Zeiss 35mm lens.
The Subject of The Shoot
I am currently in St. Louis and was visiting my friend Nick Najjar who runs a business providing closing gifts to realtors.
He belongs to a club called ‘The Backroom’ which is a private cigar-club that you can go to meet with clients, or enjoy a great cigar, grab a classic cocktail or meal, and sit in big plush leather chairs. He uses it as a workspace during the day rather than rent office space and wanted to show it to me when I came to visit.
I wanted to get a few photos of him that weren’t typical ‘business photos’ just for fun. The room was pretty dark with all the dark wood floors and dark wood walls/ceilings but I noticed a plush leather chair sitting next to a small window – perfect!
The window itself was partially diffused – the glass material was semi-opaque so it softened the light. The light was also indirect, meaning it wasn’t shining straight through the window.
This caused the light to soften so it had the same effect as using a softbox. If you are using windows at home or elsewhere that aren’t diffused, you can either add a white sheet over them to soften up the light or close the blinds (if you have material blinds vs. venetian blinds).
Lighting Setup #1 – Using Window Lighting For Side/Back Lighting
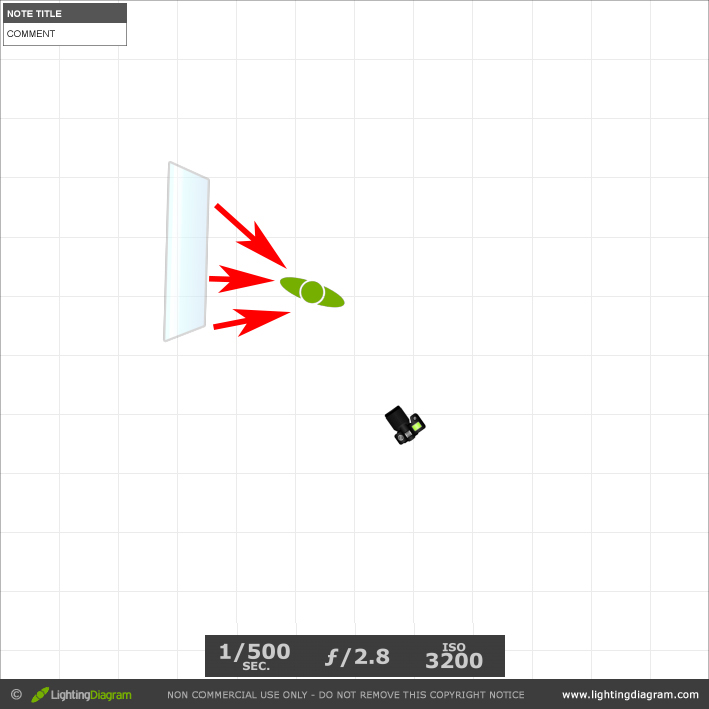
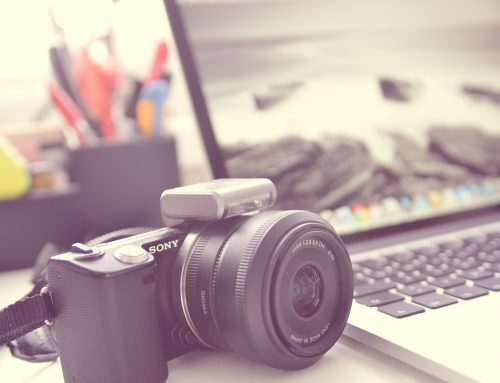
I had Nick sit in the leather chair with the window camera left and angle himself diagonally facing away from the window. The room was really dark so I dialed in my camera settings at ISO 3200, f/2.8, and 1/250 second. Here is what this looked like:
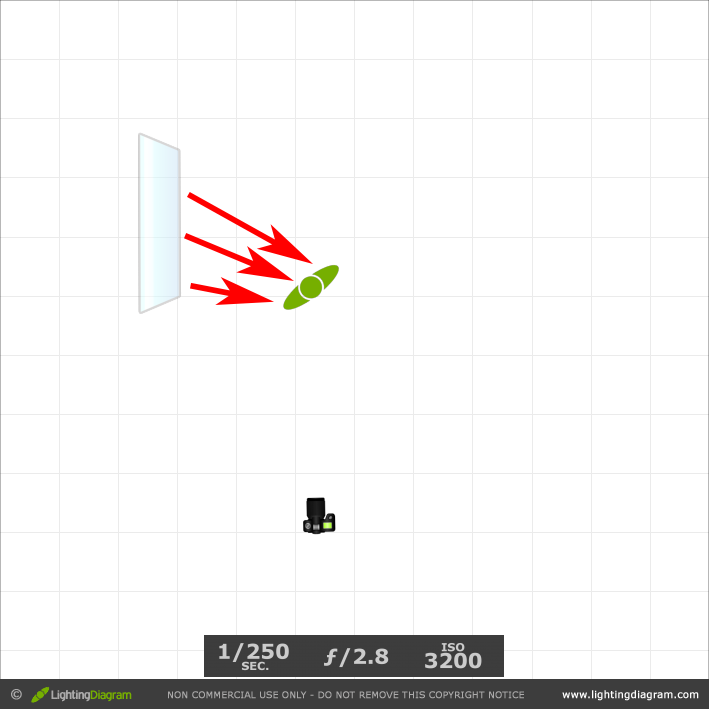
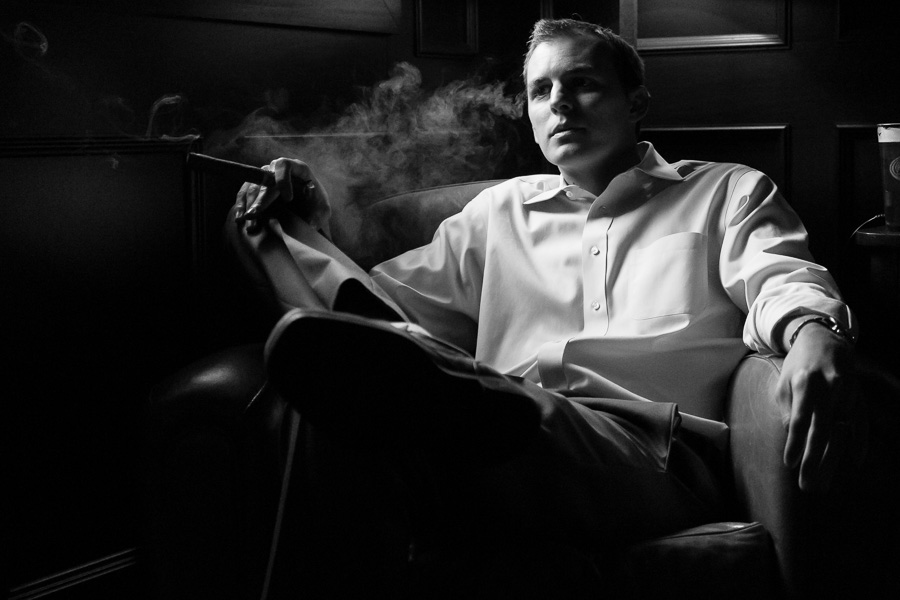
The red arrows show the light falling over Nicks side, shoulder, and back. This creates a sculpting effect as the light rakes across him and also back-lights the cigar smoke which makes it really come to life. Here is the photo using this setup:
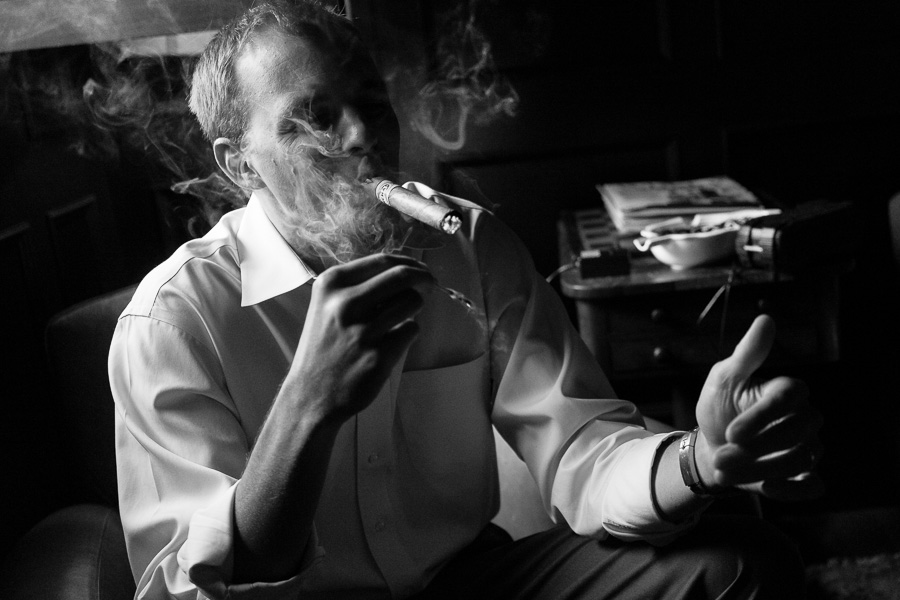
Take note of how the light falls off really quickly halfway across his face. This is because the light didn’t have anything on the opposite side to bounce off of which would have opened up some of the shadows. I like this stark transition from light to dark.
Lighting Setup #2 – Using Window Lighting for Side Lighting.
For the next shot I was looking for a more casual, relaxed feel. I just started talking with Nick and joking about few things. This created a relaxed atmosphere so he could forget about the camera and just be himself. This is a really important part of photographing people – doing whatever is necessary to help them forget the camera is there.
Nick leaned back in his chair pretty far and started smiling at something I said when he blew out some smoke – this was the perfect timing for what I had in mind. I took the shot immediately.
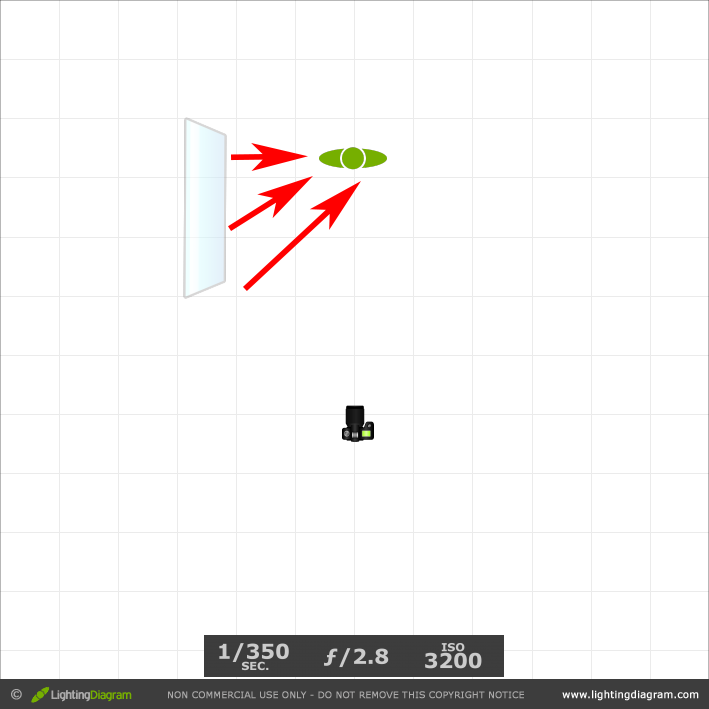
Nick was now directly facing me so he was side-lit by the window, but because he was leaning back so far in his seat the light was now able to reach the other side of his face. This is because light tends to ‘wrap’ around subjects – the bigger the light source the more it wraps around them.
See the diagram below to see how the light from the front of the window flowed out and reached the other side of Nicks face:
Here is the photo with the lighting above: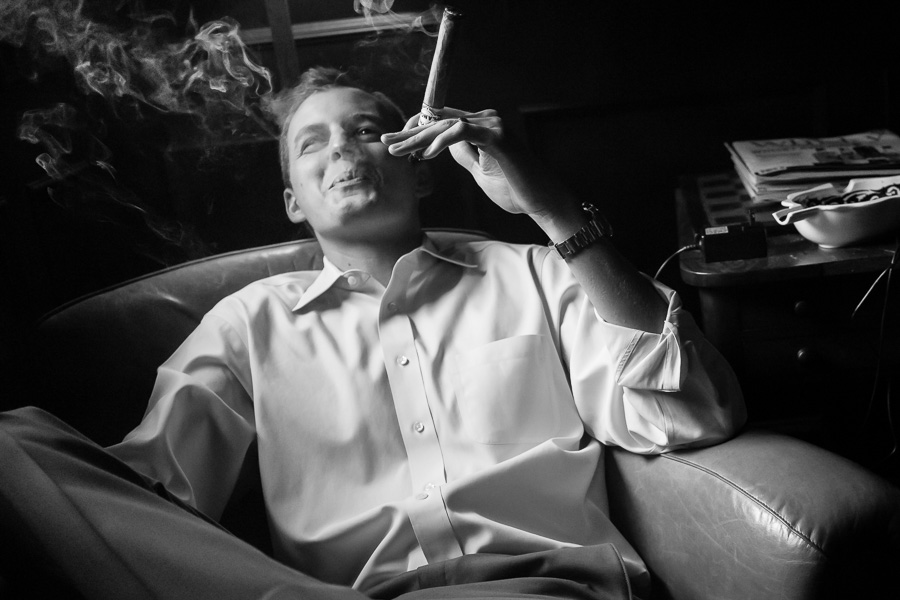
See how much less ‘drastic’ it is because you can see the other side of his face? You could also accomplish this by putting some form of a reflector on the opposite side of the window, like a white reflector, white posterboard or foamboard, or even a white wall if there happened to be one on that side.
Lighting Setup #3 – Using Window Lighting for ‘Godfather’ Lighting :)
For the last image, I wanted to create a very striking shot using similar lighting to the classic “Godfather” movie style lighting.
I decided to shoot across the chair to create an interesting angle and positioning of how Nick was sitting. This would create some cool light if shot from a diagonal angle from Nick.
I positioned myself diagonal to him and shot this:
Awesome! This is by far my favorite shot of the impromptu photo session. The light coming through the window also backlit the cigar smoke which made it look great.
I took it into post processing and applied the “Gravel” Lightroom preset from the Hacking Photography Black and White Lightroom presets to edit the shot in one click! I love using presets to speed up the editing workflow :)
If you notice – there isn’t much noise in these images even thought I was shooting at ISO 3200. I fixed this in Lightroom by sliding the ‘noise’ slider up to about ’40’ which smoothed out the noise without sacrificing detail. The Sony A7 I use also does pretty well at high ISO as well which helps.
Takeaway – You Don’t Need Lots of Gear – A Window Can Do The Trick
If you learn how to use the light around you, you can often create excellent images that are striking and unique. In this example we simply used a single window in a dark room and by changing how Nick was positioned in his chair in relation to the back window.
Try it for yourself! Just find a good window and have some fun.
Much needed information!! Thank you much.
Good stuff, Mike.
I find your presets very helpful.
The equipment you use is the same that I like very. All my big Nikon equipment sits in the basement.
I look forward to your next tutorial. It will be very helpful to see you in action step by step.
Thanks
Carl
I’m happy to hear you enjoyed it Darryl!
Hi Carl,
Thanks for the comment. I’ll see what I can do to record a shoot one of these days so you can see everything as it happens.
Very cool Mike! I have your presets and find that “Gravel and Silver” are amongst my favorite for B&W. Thanks for sharing.
Hi Mike, Enjoyed the blog, great pictures. Always good to see other lighting formats.
A few photography questions. I noted you kept the same ISO and f-stop, but varied the shutter speed. I assume you shot in manual? I assume you adjusted the speed for correct exposure? Can I assume that you set the camera on spot metering, and used single point focus?
Great tutorial. I might of panic knowing I didn’t have a flash to bring in light instead of using the resources around me; namely the ambient light.
Thanks for both challenging & encouraging me.
If I understand your article correctly, you didn’t re-position Nick’s chair in relation to the window. Just his body, in the chair?
Hi Mike.
Many thanks for the details. Very informative. Have filed off for future ref. I only have a Cannon 1000D. Highest ISO Value 1600.
What would your opinions be on using this value.
Love the shoot, Mike. Quick question for you…I am looking to buy another body in addition to the Sony a65 that I have. I really love my Sony camera, so I want to by another Sony body, however, full frame. I was considering the a99, however the smaller a7/a7II mirror-less cameras have really peaked my interest. Thoughts? and TY in advance…
Thank you, Mike. This was very helpful. I do this a lot with my grandchildren but this is not done in a dark room. Will definitely try this.
I enjoyed that. Even though I read a lot on the web because my camera of choice is a Leica X2 and so many settings do not work for me. I will be able to use not only your poses,without the cigar smoke and also you settings. Greedy fo knowledge.
Mike, as always, informative as well as inspiring. Really enjoy using the presets.
Thanks. Straightforward and easy to follow. Very useful diagrams.
Mike, I am reposting on my tablet, as my post from my phone was not accepted. So I will try again. I appreciate your help with the lighting situation. I have enjoyed thr lightroom presets, however I have not used them on a b/w situation. Thank you for your imput.
Hi Denis,
Good question! If you can only go to ISO 1600 then you would need to use a slower shutter speed or a bigger aperture. In your case, I’d highly recommend picking up a the Canon 50mm f/1.8 STM lens – these only cost $125 on Amazon: http://amzn.to/1HCM6pv. That would enable you to open up the lens to f/1.8 which let more light in while shooting in a dark room and compensate for the 1600 ISO limitation.
I hope this helps!
Hi David,
I can’t say enough about my Sony A7 – I have freaking loved that thing since getting it over a year ago. I can’t tell you how much of a Godsend a smaller camera body has been – it has literally changed the way I create images. Having the LCD viewfinder is also a game-changer – being able to see the histogram laid over the image in real-time and actually see exactly how my image is going to look has taken my image making to the next level and saved a ton of editing time.
I haven’t tried the Sony A7II yet, but I can only imagine its much better than my original A7 because of a few reasons:
-they’ve fixed the slow autofocus while in darker areas
-they’ve added a TON of autofocus points which greatly helps find focus faster
-they’ve greatly improved high ISO shooting with less noise
-they’ve added the stabilized sensor which essentially makes every lens stabilized! How awesome is that!
I’m thinking I’ll either upgrade myself to the A7II or try to hold out for an A7IIS (if they even make one – I shoot a ton of low-light stuff and that would be great to have).
When I buy new gear I either buy on Amazon: here is the link to the A7II http://amzn.to/1Phzuup. Enjoy, I hope this helps!
Hi Jane,
I’m glad to hear you are eager to try it out! A quick note that I added to the post after Steven Kersting pointed it out on the Facebook Forum: the window was opaque, which means that it softened up the light.
Most windows at home aren’t opaque so as a quick workaround you can either cover it with a white sheet or other thin material to soften the light, or wait until the light is coming in the window indirectly vs. coming straight through the window – that will also soften it up.
Sometimes if you have fabric blinds vs. venetian blinds that will also do the trick. If you shoot with a higher shutter speed it will kill more ambient light and look more dramatic.
Hi Robynne,
Thanks for commenting! I’m glad to hear this will help you!
I haven’t shot with a Leica yet but I’m eager to try it out. Are you happy with your Leica X2? What do you enjoy most about it vs. a Canon/Nikon/Sony, etc? I’ve been considering picking up some Leica glass to use on my Sony A7 and would love your feedback!
Thanks Ross, I appreciate your comment and am glad you are enjoying the presets!
Hi Kathy,
I’m glad the diagrams helped! I’ll start adding those to future blog posts so you can see how the light is hitting the subject.
Hi Ross,
Sorry about the mobile commenting problem, I’ll look into why that happened.
I’m glad this has been helpful! The black and white presets are really fun – give them a try now that you have them!
Thanks for your comment Chris! I love those ones myself and am glad you have enjoyed them in your workflow!
Hi Jim,
Great questions! I was shooting in Aperture Priority mode – it was dark so I cranked up the ISO and aperture to the max and let the camera choose my shutter speed.
If I wasn’t trying to lock the smoke in the air, I would have likely dropped the ISO down to mitigate noise.
I always use spot metering and focus locking to focus on my subject and then I recompose to my liking.
I hope this helps!
Hi Reggie,
You bring up a great point. When I was learning photography and lighting, I used to bring EVERYTHING I had so I always had a ton of options.
That is important for actual commercial shoots, but I was also doing it with casual photography too. This bogged down my workflow and made me overthink a lot of shots and miss a lot too from doing multiple lighting setups.
That was good to do while learning how to shape and use light, but now that I’ve paid my dues I tend to go as minimal as possible and utilize whats around me. That was a big reason for adding the Sony A7 to my gear, its so small that it doesn’t bog me down :)
Thats exactly right Scott. I simply had him shift around in the seat, and I also moved around a little bit around him as well.
Sorry I didn’t make that as clear as I could have!
Awesome tutorial, and badass shots of Nick! Especially the godfather shot! Thanks for sharing how you set these up. The light direction/quality explanations are really helpful and it’s cool to see how you pulled off these shots with minimal gear. I am still going through the phase of logging around a lot of equipment to learn learn lighting, so any tricks I pickup are helpful! By they way, the “Monthly Edit” subscription is awesome, I am learning a lot from them. And love Jimmy’s new haircut! Keep up the good work brotha!
Thanks homie! I’m glad to hear you are in the middle of the ‘take every freaking piece of gear I possible can to every shoot’ stage! Hahah, I remember it well and still have shoots where I do that :)
Nick is doing well – I’m about to go hang out with him in an hour. I’m seriously considering upgrading to the Sony A7II when I get back to San Diego, but I want to try it out first. If its faster in autofocus in low light and better with processing higher ISO’s than my current A7 I’ll get it.
Yeah, the low-light hunting kills me on the A7, it’s a pain in the ass. With regards to the A7II, I read the improvements in ISO and AF were just incremental, the main thing was the in-body stabilization. Anyway, let me know if you end up trying it out and if its its a big improvement. I’d be curious to hear.
Have you read up on the A7RII (announced but not on the market yet)? Some of the features on it are amazing – extremely fast phase detection AF even for 3rd party lenses, silent shutter, back-illuminated sensor, etc. However its 42MP, which is unneeded.
The A7IIR sounds good, but I’d love an A7IIS more than anything! Give me a 12MP sensor but let it see in the damn dark and I’d love it forever.
Mike,
Thanks for the feedback! You’ve been a great help.
After shooting a performance night for my son’s high school band, I’m so sold on a smaller, lighter FULL Frame body.
The Sony a65 I currently use really struggles in lower light conditions, and the higher ISOs are too noisy for my liking, without a lot of work in LR.
The only thing that sucks is that I will need all new lenses, but hey, if I were buying a full frame a99, I’d still be buying new full frame lenses.
Thanks again…
Hi Mike,
I’m really enjoying your blogs and website. I’m relatively new to photography and I find your correspondence insightful.
I’m looking forward to your Lightroom editing tutorials. One question I have is, what processing is required for the average picture in Lightroom? I’ve read articles explaining how cameras process and enhance pictures that they save as jpeg’s but they don’t process and enhance pictures taken in RAW. I’ve also read articles that say because of that, all RAW images need some degree of enhancement. And, I’ve read that RAW images are actually enhanced by the camera and don’t require any additional enhancement. Can you please shed some light on this topic?
Thanks Mike, I really appreciate the advice.
Hi Rob,
Sorry for the delay here, I’ve been on the road for the past week with no internet access!
Okay, to your question: this has to do with how JPG and RAW images are processed (and not processed). When your camera records a JPG image, it automatically takes all the information in that image and compresses it WAY DOWN to save space. When you shoot a JPG you are essentially trusting the camera to do the edit for you.
When shot as a JPG, you loose a ton of information in the file and thus are very limited in how much flexibility you have to edit afterward. You can’t easily change the white balance selection, you can’t pull out as much details from the shadows or highlights, etc because thee isn’t enough info to do so. This is why a lot of people don’t edit a ton on their JPG images.
RAW files on the other hand don’t compress the file so they have a TON MORE information in them. They are essentially unprocessed and uncompressed so this makes the file size MUCH larger. That said, RAW files give you the most flexibility in that you have more info to work with. You can change the white balance afterward, you can fix overexposed or underexposed images, etc.
Because RAW images are unprocessed you will need to do some processing on them whereas JPG images don’t necessarily require processing.
I always shoot RAW because I want the most flexibility in editing later. If you don’t care about editing then you could shoot JPG. Does this help clear it up?
This is great advice as I will be doing a Boudoir session next week. Great tips for this. Thanks!!