We’re in the home stretch for backing up all your critical data!
In this series:
Part 1 covered both Step 1 — Selecting your backup software, and Step 2 — Selecting your backup destination(s).
Part 2 covered Step 3 — Backing up your photos, documents and general files.
Now we are to the last step for protecting your critical files. Step 4 — Backing up Lightroom and Photoshop specific data.
We will then conclude with Step 5 — Protecting your Operating System and Programs.
Step 4 — Backup Lightroom and Photoshop specific data
Backing up your photos is not enough to protect your photography work. Lightroom and Photoshop both have critical data in them you don’t want to lose.
Lightroom
There are two key components with Lightroom that you need to backup which may not have been protected in Step 3. We’ll now look specifically at backing up the Lightroom Catalog and Presets.
The Lightroom Catalog
The most critical thing to protect is your Lightroom Catalog. This is the organization system behind all your photos, edits and categorizing. You may have one master catalog or manage multiple catalogs for different purposes. You need to protect them all.
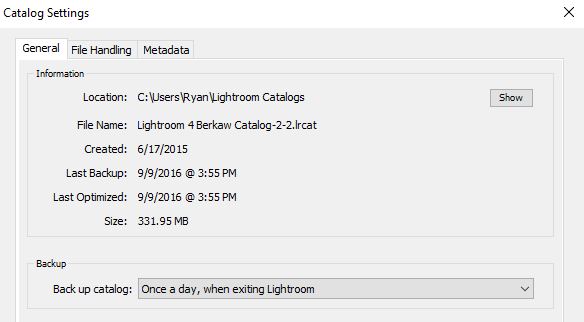
Adobe has made it very easy to find your catalogs. Under the “Edit” menu, (“Lightroom” menu on Mac), choose “Catalog Settings”. This will show you the location for your current catalog. There is also a “Show” button that will take you to the location.
In your backup software, make sure you have selected your catalog to backup (the file that ends in “.lrcat”). If you have multiple catalogs and they are not all in this same directory, you should open each catalog in Lightoom and then go into “Catalog Settings” to find them as well.
You may also select the entire directory that stores your catalog(s). However, if you do that, make sure you UNSELECT the Preview folders (shown below ending in “.lrdata”), as those will change often and do not need to be protected since Lightroom can easily re-create them.

Notice the Preview items have the check marks removed
Lightroom Presets
You most likely have invested a lot of time and possibly money into Lightroom Presets. There are saved Presets for:
- Import and Export settings
- Keywords, Labels and Locations
- Watermarks
- Web Galleries and Templates
- and probably the most important — Develop Presets — whether you created them on your own or have purchased some (such as the great sets available from Hacking Photography)
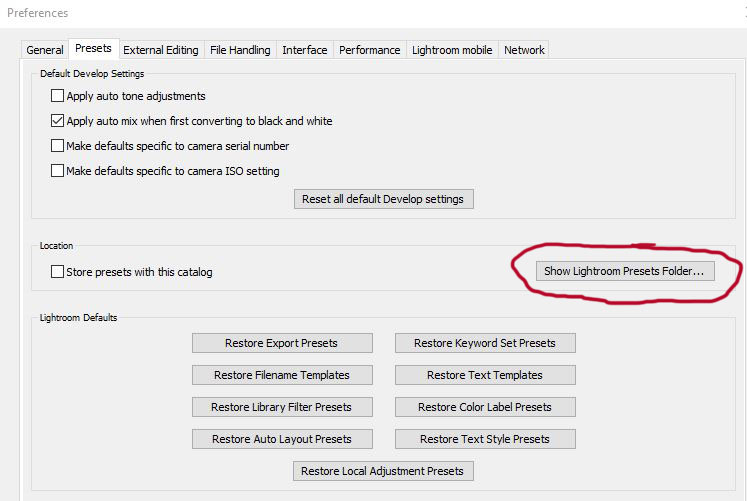
The good news is that all these Presets are normally located within the same directory. To find it, go to “Edit” (or “Lightroom”), then select “Preferences”. On that screen you will find a tab for “Presets”. Right on that screen is a button titled “Show Lightroom Presets Folder…”
I do not check the button “Store presets with this catalog”. If you do, the presets will be specific to that catalog and you would have to re-import or recreate them for each new catalog you make. By keeping them in the default location they can be used by all catalogs on your computer.
The default location in Windows is inside the user directory on the C: drive. On mine it is at C:/Users/Ryan/AppData/Roaming/Adobe… and then the directory inside Adobe that you want to backup is titled “Lightroom”. It has separate folders for all the different types of Presets, but if you just backup the entire “Lightroom” folder it will protect all of them. (Note: In Windows, the “AppData” folder is hidden, so if you haven’t already you have to turn on “View Hidden Folders” to see them from Windows Explorer.)
Bonus Tip for Backing Up Original Photos
I always make sure I have a second copy of my photos before reformatting my memory card in-camera. In addition to backups, I use a quick feature in Lightroom to immediately create a second copy onto another drive. As I have mentioned previously, drive space is relatively cheap so I made sure the backup drive I bought would have enough room.
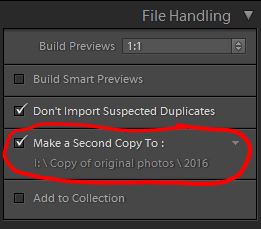
On my backup drive, I created a second directory called “Copy of original photos”. I then created a new directory inside that for the current year (and make a new one every January). In the Lightroom Import wizard, you will find an option in the top right under File Handling that says, “Make a Second Copy To:”. Click there to select the directory for the current year.
It will automatically create folders in that location based on Import date and not the folder name you select for your main import. Therefore, it’s not the easiest to find what you need — but hopefully you will never need to go looking. At the same time, this helps you make a second copy immediately to protect the shoot you just completed.
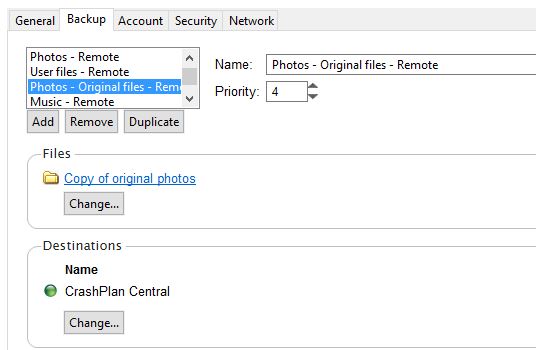
Since this IS a backup, you don’t need to include it in your backup to your local backup drive. That would just be making another copy on the same drive which could fail. However, since I pay for cloud backup with unlimited storage, I created a second backup job I called “Photos – Original files – Remote” which does send a copy of these to the cloud.
If/when that drive starts getting full, I just delete previous years or months out of that “Original Files” folder. I feel safe doing so since they were an initial protection approach and once the copies imported into Lightroom are fully in my standard backups I don’t really need them any longer. Plus, since I have them set to “never delete” in my Crashplan backups, I can always get them there if required.
Photoshop
Similar to Lightroom, there are many important things within Photoshop you want to protect. These include: Actions, Brushes, Patterns and much more.
I’ll fully admit I don’t use Photoshop as much as Lightroom and have not found the “perfect/easy” way to back up the settings. However, after doing significant research I’ve come to the realization that it is not as simple as protecting two specific items like with Lightroom. Here is what I have found, plus a big recommendation.
- Photoshop puts all the Brushes, Actions, etc. into a “Presets” folder.
- However, on my system it made two in different locations… yet only one has all the data, so you want to make sure you backup the right one.
- In the AppData/Roaming/Adobe area where you found the Lightroom Presets there is also a folder for your version of Photoshop. It appears it makes a new folder with each version upgrade – Currently named “Adobe Photoshop CC 2017”. In that folder there is one called Presets, which includes sub-folders for Actions, Brushes, etc. HOWEVER, don’t just backup the Photoshop Presets folder and think you are safe. When I look in those, they are all EMPTY!
- If you go to the actual Program Files directory and find the installation of Photoshop (again, separate folders for different versions) there is again a folder called Presets. THIS is where the sub-folders actually had my saved items.
- I have set-up my backup software to save BOTH Preset folders, just as a precaution. But… when a new version comes out you will need to protect that as well.
- You could just backup the entire Adobe folder to automatically get the new ones instead. However, if your Lightroom catalogs (and preview files) are included, make sure to go back and unselect the Lightroom Previews as we did earlier.
Big Recommendation
This applies to both Lightroom and Photoshop…
When you purchase (or simply download) any Presets, Brushes, Actions, Templates, etc., DO NOT simply save or install them inside Lightroom or Photoshop. You should create a folder in your Documents directory and first save them all there.
It is a worthwhile step to always ensure you have the original version of any components you have bought for both Lightroom and Photoshop. This way, if something goes wrong when you try to specifically restore your backups from the applications’ directories, you can simply reinstall everything you had spent your precious money on.
This is especially important for Photoshop since backing up/protecting all of its settings is not as clear of a process as protecting Lightroom.

Next Steps
You should already have your backup software protecting your photos and general files as described in Part 2. Now it’s time to follow the instructions above and protect Lightroom and Photoshop.
This series will conclude in Part 4 covering how to protect your operating system and programs.

Ryan- Trying to use LRCC ‘to create a second copy’ on import as a back-up measure, I find that option for me is grayed out. Any suggestions?
Meader — Are you using the “Add” Function when you bring the photos into Lightroom? When I just played around with it, it looks like it gets grayed out when you do that… probably because at that point Lightroom isn’t actually “Importing” the photos (making a copy of the photos) at all, it’s just being pointed to a location for them.
Great articles. Thank you.
Hi Ryan,
this series of articles is the clearest method I’ve come across. Thank you! I’m following your advice closely and now have crashplan up and running- i’m impressed with how simple it is to use. Now just waiting for the last episode on system files. Thanks again.
Hi Brenda,
I’m glad you enjoyed the post! Backing up files is crucial and you’ll definitely sleep better at night knowing all the photos you hold dear are safe!
Hi Mike,
do you know when the final installment will be posted please? I’m confident that all my image files are now safe, but not so sure that my program files are.
best wishes
Brenda
Hi Brenda, great question! Let me check with the author and I’ll see when its due :)