In Part 1 we discussed:
- Dangers to your data and why you need to backup
- The difference between Backup and Archive
- Steps 1 and 2 — Selecting both your backup software and backup destinations
Now it’s time to start backing up!
Step 3 — Backup your photos, documents and general files
There are 4 things you will need to decide when creating your backups:
- What files will be backed up
- Where the backups will be stored
- How often backups will occur
- How long backups are kept
Since different backup software will have you set these up in different ways, I can’t explain exactly how to do this for all applications. I will address them at a high level and show you how to do it in Crashplan. If you are using different backup software, you will need to look around to find the settings but most are now wizard driven and shouldn’t be very hard.

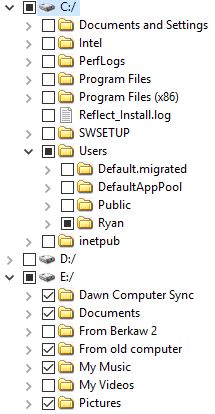
This is part of the selection screen for choosing what gets backed up on my system. Some files are on my C: drive, but most of my actual documents, photos and music are on a second drive in my computer. A check mark means everything in that directory will be backed up. The solid square box means only some directories inside are selected for backup.
What files will be backed up
Your backup software will have a window where you select what directories to backup. You could select your entire main hard drive (and any other drives you use for storing data), but not all of that is needed or usable if you have to recover from a complete hard drive failure.
We will address protecting your overall Operating System and programs in Step 5. For now, we are focused on protecting your important data.
Most users store all their work within a main user directory (often labeled with their first name. i.e. “Ryan”), and then have sub-directories for Documents, Music, Photos, Videos, etc. This is the standard set-up for both Windows and Mac.
Within your backup software you will put checkboxes next to the directories you want backed up. If you select the “Photos” directory, everything within it will automatically be backed up. If you have something you purposefully want excluded, such as the Lightroom Preview files we will exclude later in Step 4; all you have to do is uncheck the specific files or folders you want skipped.
You most likely want to backup all the main standard folders (Documents, Photos, Music, Videos) as well as any other folders where you specifically store data. If you store files or other important things on your Desktop, then you should also backup the “Desktop” folder in your user directory.
Lastly, think about the main programs you use to determine if any of them have you store files somewhere other than the folders you have already selected. You will want to make sure you select all folders where you save files you need backed up, even if they aren’t in these standard ones in your user directory.
Where the backups will be stored
In Step 2 you decided on your backup destinations. Your local backups should be going onto a separate drive which does not include data you need to backup.
Some backup software, like Apple’s Time Machine, will want to own the entire drive (or a formatted partition of a drive). Others just need you to point them to a directory.
In my case, my backup drive (designated drive I:) has a specific folder which I named “Crashplan backups on MyBook Duo”. That is the location where I point Crashplan. It will automatically make a subdirectory with a long numerical name for the backups specific to my computer.
If you look in this directory after doing backups you will notice it will not have copies of your actual files. Backup software puts the backups into their own backup format for indexing, versioning and advanced functions like deduplication which allow the backups to take-up less space. When you need to recover a file you will do it through the backup software and it will extract the requested files.
In Crashplan you can make one “backup job” and have it backup to both your external drive and the Crashplan Cloud. Or, you can make separate jobs for each. Most people will probably do everything in one job with two destinations.

How often backups will occur
Traditionally people backed up their files once a day. Modern backup software often offers “continuous backup” meaning it will backup files shortly after they are created or edited.
Specific to Crashplan, the free version will only allow you to do a daily backup. If you subscribe to their cloud backup service, you can set the backup frequency much tighter for both local and cloud backups. I have it set to backup every 15 minutes, although it can be set as tight as every one minute.
How long backups are kept
Most backup software allows to you create a “retention policy”. This means how long backups are kept before deletion. Since disk space is relatively cheap and Crashplan does use deduplication to reduce the size of the backups, I keep a lot of restore points and never have it remove deleted files.
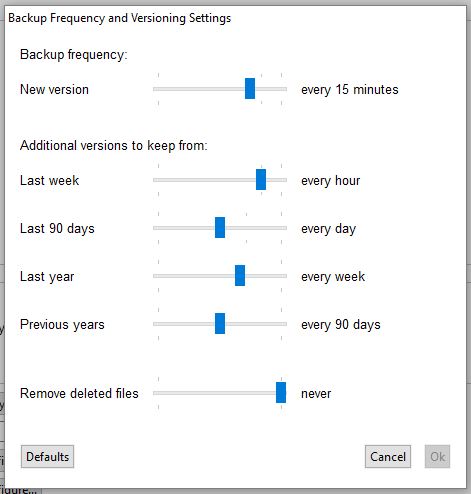
My current frequency and retention policies
To the right is a screenshot for my policies in Crashplan. You edit these by going into “Frequency and Versions” under your backup job.
At the top I set it to back up every 15 minutes.
Additional versions — This is how long it will keep all of those backups that it is doing as often as every minute.
Normally you want tighter time options for just the past few days. For example, if you accidentally deleted something yesterday afternoon you may know you want to restore that file as it was at 3 p.m. If it is a month from now, you normally don’t need to go to a specific time, but instead want to go back to just a specific day.
Therefore, in my policy it keeps hourly backups for 1 week, but then starts thinning them out. Daily restore points are kept for 90 days, and then it thins them further to weekly restore points for the past year and then quarterlies (every 90 days) forever.
I also have it set to never remove deleted files. Some backup software (Crashplan included) may delete the backups of a specific file a certain length of time after that file has actually been deleted from the computer. For example, I had mentioned how Carbonite will remove all backups of a file only 30 days after that file has been deleted and you cannot change that setting. In Crashplan, setting this to “never” will always maintain the backup copies of that file if you go to restore from a previous date even if the file was deleted from the computer.
Note: I’m probably a little extreme with my retention policies and I do have the space so it’s not an issue. Most people would never need to go back to a backup from over a year ago. In that case, you could use my same settings, but for Previous Years choose “Never” and for Remove Deleted Files choose “Every Year”.

Next Steps
It’s now time to set-up your backup software to protect your general files and photos using the information above. The last parts in this series will cover:
- Protecting specific applications such as Lightroom and Photoshop
- How to create a backup of your entire Operating System and programs


This is very timely! Thank you for sharing this information. I am in the process of trying to back-up my photos and the external drive keeps crashing (not enough room I guess even though it is a 3 TB external and I have 1 TB to back-up – not sure what’s up with that! I look forward to Part 3.
is part 3 available yet ?? – great read !
Hi Paul, it should be available any day now!