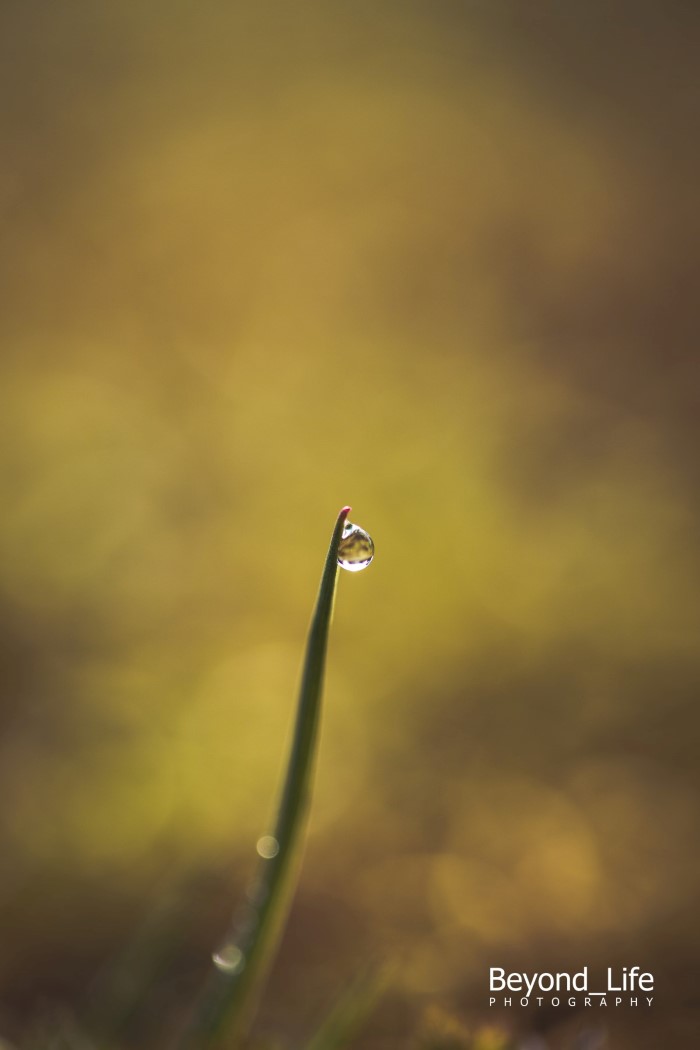
In my previous article, “Sharpness is overrated“, I highlighted a technique of taking macro shots. Extension tubes, in combination with Tamron 90mm, were used throughout the process. Moreover, the shots in this Flickr album were created using this combination.
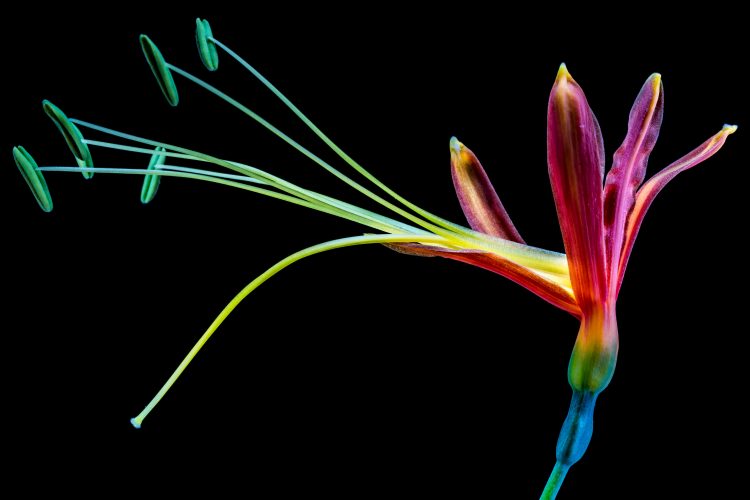
The following three shots were also produced through the same combination of tubes and a macro lens. This was not a consequence of the Tamron lens, but due to the distance of the subject. The macro lens wasn’t sufficient to allow for a close up image of the subject.


However, not everyone has the resources to purchase a quality macro lens such as the
Tamron 90mm 2.8 (Amazon/B&H Photo), 100mm L from Canon (Amazon/B&H Photo), or Nikon equivalents. This led to a revolution where photographers sought change.
Fortunately, today we are blessed with small features that can turn almost any lens into a macro lens. Alas, we reach the story of extension tubes.
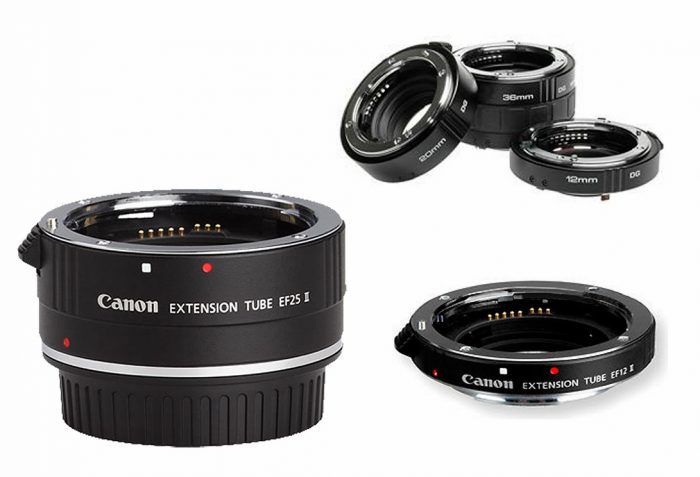
What are extension tubes?
An extension tube is an attachment that goes between your camera body and the lens. However, it’s not an optical element, as there is no glass involved. It is an instrument that allows the lens to be further away from the focal plane.
Extension is the term used to describe the distance that the front element of your lens can be moved forwards. The further forward the element, the closer your lens can focus on the subject.
The extension tube moves your lens further from the camera, and in turn, the front element closer to the subject. Basically, the closer you can focus, the more magnification you achieve.
In essence, the practical upshot of this is that your minimum focusing distance grows smaller. So, with an extension tube, you can get closer to your subject; you can fill the frame with more, and still achieve focus. Once again, the closer you can focus, the more magnification you get.
There are two types of tubes you can get:
- Cheaper options that don’t maintain the electrical connection between the lens and camera body
- Expensive tubes that do maintain the connection between lens and body.
Unsurprisingly, there is an enormous downside to the first approach. Keep in mind that when you remove a lens from your camera, the aperture will reset to its widest opening.
While there are tricks to maintain aperture after removing a lens, it’s tricky and quite difficult to do. Such a task is especially cumbersome when you are required to repeatedly do it, exposing your sensor and lens to the open air. That’s not what we want.

Pros and cons
Despite the advantages, there are a few downsides to using extension tubes, for both the ones with and without maintaining the connection.
The biggest con is that you’ll require greater lighting. The amount of additional light depends on how many extension tubes you add. Therefore, you must either lower your aperture, increase the iso, or add more light to the subject.
However, if you are a studio shooter, adding light shouldn’t be too troublesome. Lowering the aperture means that you will lose depth of field, and raising the iso could result in subsidiary noise in your shot.
A useful technique to overcome this complication is through utilizing an extra light source; such as, an off-camera flash, or a ring flash.

Pros:
- If you scour on Ebay or Amazon, cheap extension tubes can be found
- You can get extremely creative with one tube, or a whole bunch
- They don’t take up a lot of space in your bag
- Cheap sets are very easy to get, and fast to replace
Cons:
- You need more light
- Depending on the quality of your purchase, be prepared to spend big bucks
- The tubes that have connections are often more fragile
- It can be hassle if you want to use them on the fly
Where can I get extension tubes?
Luckily, getting a set of tubes isn’t hard. However, purchasing a quality product is difficult and expensive.
If you want a 12mm Canon Extension tube at B&H Photo, it will set you back $80. If you search Ebay for Canon EF extension tubes, you can grab something cheap for just $6.00.
The version that I bought will set you back $17 (Amazon/Ebay). For merely $17 you’ll be on your way.
How do they work?
You can use tubes on (almost) any lens. Simply attach the tubes like you attach any lens, and then attach the lens you want to work with.
I found that my tubes work amazingly on the 90mm Tamron(Amazon/B&H Photo), 50mm Canon 1.8 (Amazon/B&H Photo), and my 40mm STM (Amazon/B&H Photo). For some reason the performance is subpar when using it in conjunction with a 24-105 f/4 (Amazon/B&H Photo), or any of my Lensbaby body’s (Amazon/B&H Photo).
Get the tubes situated on your camera and get comfortable with them. I like to move my camera to focus instead of twisting the focus ring on the lens, maybe this will work for you as well. Start off with one ring and add another when you desire more magnification. Remember to have fun!

A few safety tips
The tubes attach to your camera like any lens. They go between the lens and the body. If you use more then one, make sure you support the tubes. Lenses are made to attach directly to the camera, and adding something in between will shift the weight to the front.
Moreover, in the worst case scenario, the tubes can break, causing you to drop the camera and lens. As we all know, dropping things can cost you a small fortune.
Keep this in mind when you shoot from a tripod. You can imagine how front heavy a Tamron 90mm + 3 tubes (800gr) can be on a tripod. I prefer to simply hold the entire apparatus with my hands.
When you have tubes attached to your body, and you want to change lenses, don’t forget to turn off the camera. With the tubes attached, the camera still thinks there is a lens there and it won’t turn off automatically. And we all know what happens with active sensors that are exposed to open air: they turn into a dust magnet.

So there you have it, a short introduction to extension tubes and how to handle them. If the opportunity arises to get a set, do it. It will open up a whole new world of photography.
Robert Wiggers is a photog who likes to explore all fields of photography. It’s his goal to create something from nothing, with anything. You can find his work at www.wiggersrobert.nl, his Flickr account or you can buy prints, canvas or Xpozer prints at www.werkaandemuur.nl.


Thanks Robert! A macro lens is my next planned investment… but since I just bought a wide angle it is probably going to be a while. I had considered extension tubes, but decided to hold off and do it “the right way” by buying a macro and not then having the tubes be wasted money. This article helps me realize I could start with the tubes and still use them WITH the macro to get even more creative.
Wonderful information here, but don’t forget about mention Pentax and their equipment. Being a Pentaxian, I’ve what wonderful macro images with extension tubes and bellows and even using Raynox 250 on film lenses and it’s been a truly wonderful photographic journey!
correction.