BY BRADLEY SCHWEIT – sandiegophotographer.com
Ever since photography was developed (no pun intended) lens flare has largely been viewed as a negative side effect of shooting under specific conditions. In fact, photographers did (and still do) go to great lengths to avoid lens flare at all costs… and under certain circumstances avoiding lens flares is understandable.
For example, I was photographing a property for a local real estate agent this past week and the sun was such that, even with my lens hood, I still had to raise my left hand to block the light and avoid the inevitable bright circles on the final image.
As any seasoned photographer is well aware, removing lens flare during editing is no easy task! Real estate photography obviously doesn’t encourage the creation and/or use of lens flare, but there are many situations in which lens flare can actually enhance an image. Read along to learn how and when…

What is lens flare?
First, let’s provide a brief definition and description of what lens flare really is (other than a cool effect you can achieve by following the steps outlined in this article).
From a technical standpoint, lens flare is the result of a light source, natural or otherwise, reflecting off the internal components of a camera lens. Most lenses have numerous elements, thus resulting in multiple light “orbs” when the camera captures lens flare.
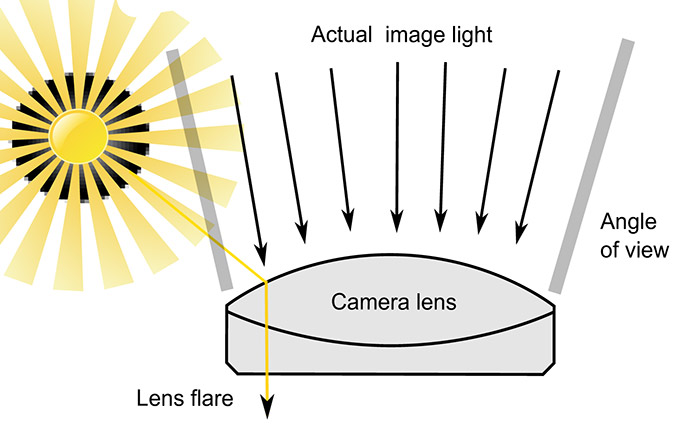
By Tele_lens.svg: *Tele_lens.png: Anoneditorderivative work: AhrumanSun.svg: Bcjordan derivative work: Ggia (talk) – Tele_lens.svgSun.svg, CC BY-SA 3.0, https://commons.wikimedia.org/w/index.php?curid=10689519
From an aesthetic perspective, lens flare is an effect that, when achieved by adhering to the following steps, can add… well, flare, to what may otherwise be a somewhat boring photograph!
Now, let’s discuss how to achieve lens flare in a few easy steps.
6 Steps to nail perfect lens flare in your photographs

Step 1: Harness either morning or evening light for great lens flares
These are not only the best times of day to achieve the softest, most desirable natural light, but those early or late hours are also when the sun happens to be at the optimal angles for achieving quality lens flare (clean, crisp light orbs and lines).
Another benefit is that you don’t have to contort your body into expert-level yoga positions to get the desired effect, as you would during other times of day :)
Step 2: Ditch the lens hood
Hoods are designed to eliminate and minimize lens flare. The obvious initial step towards achieving brilliant lens flare in an image is to get rid of the lens hoods that eliminates the sun flares!
Step 3: Be sure your subject is back-lit for best lens flare
Since you need the direct sunlight or artificial light source to produce the lens flare itself, it goes without saying that you MUST shoot your subject with the sun behind him/her/it.

Step 4: Play with your angles
Once you have your subject in the general desired position, start firing off a number of “test shots” to find out which angle and position will produce the best and most desirable lens flare.
Obviously “best” and “desirable” are subjective terms, but regardless, the process remains the same. Bear in mind that when capturing lens flares with the sun as your light source, it can change significantly (and quickly) as the sun rises or sets.
Step 5: Experiment with both auto and manual focus
This is likely the trickiest aspect to capturing lens flare, as the auto-focusing systems on most digital cameras have a difficult time finding a focus point when shooting directly into a light source.
Fret not, as there are indeed options:
- use your free hand to block the light source while focusing on your subject (then moving it out of the way once the camera has selected the desired auto-focus point), or
- switch to manual focus. I find #1 to be a much easier approach, as attempting to manually focus on a subject while shooting into direct light is by no means an easy task (as it’s hard to discern whether or not your subject is truly in focus).

Step 6: Properly position the lens flare
While playing with both angles and focus settings, always keep in mind where the lens flares are located. You don’t want any of the light orbs or bands to cover your subject’s face, or key areas of whatever it is you happen to be photographing.
When utilized properly, and under the right circumstances, lens flare can indeed enhance a variety of images. The key concepts to take away from this post are “utilized properly” and “under the right circumstances.”
Sometimes (as in the case of my real estate shoot), lens flare can ruin an otherwise perfect photo. In the case of, say, photographing a backlit model in a barren, open field, however, it can make an ordinary photo extraordinary.
In summary:
- Properly executed lens flares can take an otherwise simple photo and create a dramatic effect.
- When capturing lens flares, keep in mind the light source will be reflecting off multiple elements within the camera lens. In other words, whatever tiny dust particles, hairs, etc., that happen to be trapped within the lens itself (that would otherwise never show in a non-lens flare image) will reflect (no pun intended) in the photo. I’ve intentionally kept such spots in this image so you know what to look for in your own lens-flare photos (see orange light orb in bottom right).
- Always be sure to keep the lens flare in a location where it isn’t interfering with or detracting from the subject; such as off a person’s face.
- Lens flares not only serves to add color and brilliance to an image, it also (when properly positioned) draws the viewer’s eye towards whatever the lens flares happen to be highlighting.
Check out a few more beautiful examples below!


Awesome article Bradley. I think I’ll ditch the lens hood way more often now!
Certainly food for thought, difficult as a landscaper to try and add flair, normally my response to flair is to re shoot with a cleaner lens but certainly it can add to some shots as you have demonstrated.
I would presume that the focusing against metering aspect would certainly be helped using back button focusing, ie if you shade with hand for focus, then remove shade from hand for metering and fire must be helpful, it takes a while to get used to, occasionally even now I convince myself that the focus is broken only to find I’m still trying to focus from the shutter release but I think in the long run separating focus from meter is the right way to go. How do you shoot with that regard?
Bradley, interesting article! I’m going on a workshop this weekend, think I’ll give this a try! LOVE the snail shot!