Welcome back to Day 3. Today we are going to dive into ISO.
What is ISO:
ISO (pronounced “EYE- ESS-OH”) is really easy. The ISO number on your camera refers to the camera sensors sensitivity to light when the shutter is open.
Think of getting a perfect tan as the parallel with getting a perfect exposure in your photo. ISO is the tanning oil (not sunblock) that makes your skin more sensitive to light. The more ISO/tanning oil you add, the more light your skin absorbs. The less tanning oil/ISO the less sensitive your skin is to light. In effect, the higher ISO you need, the shorter shutter speed you can get away with in order to get the same exposure. The more tanning oil you put on, the less time you need to be in the sun to get a perfect tan.
Another perfect analogy is that too much tanning creates rough skin. Well, too much ISO creates rough, grainy photos. Stay tuned and you will see why you don’t want to crank up the ISO in every photo.
The ISO scale on most cameras typically start out at 100-200 (low) and can go as high on some cameras as 102,000 but most can go up to 12,800 or 25,600. If you are shooting in the middle of a bright afternoon, you will likely use a low ISO like 200 because its really bright outside and your sensor doesn’t need much sensitivity to get a lot of light. If you are shooting at night with very little available light/no flash, you will likely use a much higher iso (2000 for example) because high ISO. Higher ISO lets you “squeeze” more light out of the same lighting conditions and use a faster shutter speed for hand-held photography.
When to use ISO:
1. When you want your shutter speed faster and you’re not using flash.
If you are shooting indoors and don’t want to use a flash, you can increase the ISO which will increase your shutter speed assuming you aren’t shooting full manual.
Example: I was shooting in Aperture Priority – I chose the aperture and the camera chose the rest. I was photographing a building from a friends balcony at night and hand-holding the camera. I was at the biggest aperture my lens allowed- f/3.5, ISO 200, and the camera selected a shutter speed of 1 second for the correct exposure.
I would have a very difficult time holding the camera perfectly still that long without the camera shaking and blurring the photo. Anytime I want more light in the camera I can either decrease shutter speed (won’t work in this example because slower shutter= more camera shake when handholding), use a smaller aperture number/bigger aperture (my aperture is maxed out in this example), or increase ISO – my only choice in this scenario.
In this case I can increase the ISO way up to 2000 and reduce the shutter speed from 1 second to 1/4 second. This enables me to carefully hand-hold and still get a clean shot without camera shake. Here is the shot taken at f/3.5, ISO 2000, which created a 1/4 second shutter speed:
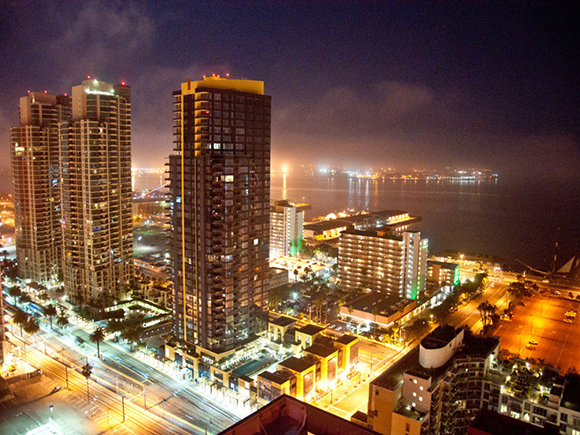
Handheld photo at night-using high ISO of 2000
So why not always crank up the ISO as high as it can go?
One word: GRAIN. As you increase the ISO in your camera, it creates more grain in the image. You can’t see it well in the photo above because the image size is small, so lets crop out a small portion between the two buildings on the left to show you. See the close crop below:
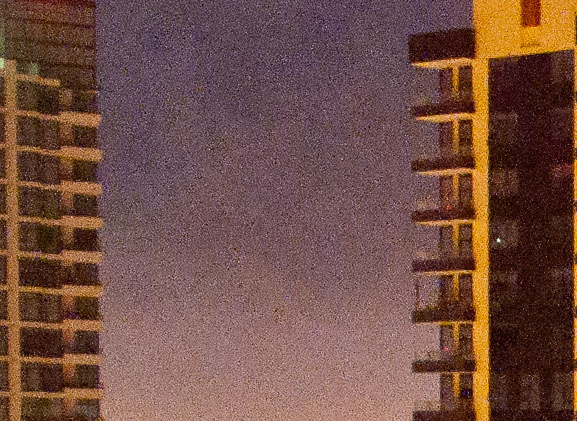
High ISO creates grain in your image.
Again, this doesn’t matter unless you are looking REAL CLOSE (your standing 2 inches away from a 4ft. print on the wall), or you go SUPER HIGH UP on the ISO range to over 3200, then things start looking really bad/fuzzy. Digital cameras have come a long way in cleanly processing high ISO since I started shooting but you should still aim for the lowest ISO you can get away with.
2. When you want to capture the ambiance (ambient/available light).
Most newer photographers get average pictures because they are stuck in Automatic mode. When it gets darker in a room, the cameras brain says “its getting dark, pop the flash!” Popping the flash often reduces the shutter speed because the flash is going to provide its own light and doesn’t need to stay open longer. The problem with this is that only the subject is lit by the flash shows up in the photo.
This often leads to dull flat photos where the subject in the foreground is lit, but everything else is dark. This happens because the light from the flash only travels far enough to light what is directly in front of it.
When you learn how to balance Aperture and ISO, you get more natural-looking photos. Here is a photo of me in a bowling alley (dark room, lots of colored lights) trying to throw a bowling ball as far down the lane as I could before it touched down :) Yes, I had a few drinks before attempting this – it made it about halfway down the lane before touchdown!
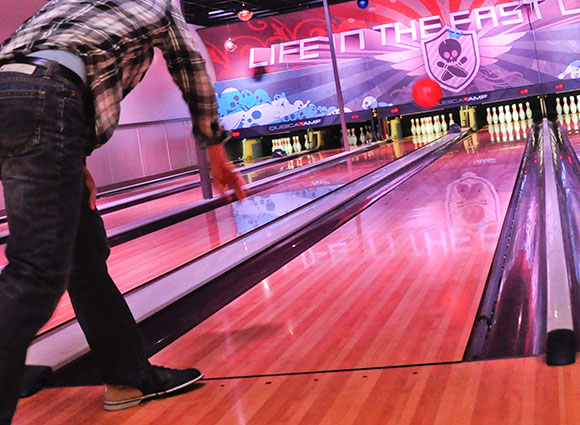
using a high ISO created a higher shutter speed to capture this bowling ball in mid air without a flash
I was using a fast 50mm f/1.4 lens which allowed me to bump the ISO to 1250 to get a shutter speed of 1/60 second to freeze the ball in mid-air. Pro tip: once you get through the 10 day crash course start dialing in your camera before handing it to an amateur. This way they can’t mess it up!
Quick ISO exercise:
Set your camera down on a flat surface so it doesn’t move. Put the camera on Aperture priority (“A” on the Nikon dial, “AV” on the Canon dial). Without moving the camera, put your aperture/f-stop number on f/5.6, put your ISO at 200, and take note of the shutter speed. Right now my camera reads f/5.6 and ISO 200, my shutter speed is at 1/5 second. Now bump your ISO up one value at a time and note what happens to the shutter speed. Here is what mine looks like as I increase ISO:
f/5.6, ISO 200, shutter speed: 1/5
f/5.6, ISO 250, shutter speed: 1/6
f/5.6, ISO 320, shutter speed: 1/8
f/5.6, ISO 400, shutter speed: 1/10
f/5.6, ISO 500, shutter speed: 1/13
f/5.6, ISO 640, shutter speed: 1/15
f/5.6, ISO 800, shutter speed: 1/20
f/5.6, ISO 1000, shutter speed: 1/25
f/5.6, ISO 1250, shutter speed: 1/30
f/5.6, ISO 2000, shutter speed: 1/40
f/5.6, ISO 2500, shutter speed: 1/50
f/5.6, ISO 3200, shutter speed: 1/60
See a pattern? The shutter speed on your camera for this exercise could be very different if your room is brighter or darker than mine, but the effect will be the same. Hopefully you can see that as you bump up your ISO while keeping the aperture/f-# consistent, the shutter speed will increase. So next time your shooting people and they show up blurry, crank up the ISO to freeze them in place.
Remember to adjust your ISO back when it gets light again, or before you start using flash again!
I’ve made this mistake plenty of times. I was shooting in a dark room without flash at ISO 1600 or 2000, then started using flash or went back outside.
Okay class, day 3 is ajourned!
I’ll see you tomorrow for our class on
Great explanation!
Thanks Steven! Let me know if there are any other things you’d like to learn!