Today we are going to explain exposure, and how to nail the right exposure every time.
Once you understand how to get the right exposure each time, you will be unstoppable!
Lets review what controls exposure
Three things are gatekeepers to the perfect exposure. They may seem familiar to you because we covered them in day 1, day 2, and day 3 of the crash course.
Aperture
The aperture controls the lens diaphragm size. Each aperture setting is shown as the F-number, or F-stop #. Each incremental increase or decrease in the F-stop represents a doubling and halving of the amount of light passing through.
Shutter Speed
Shutter speed is the speed in which the curtain opens and closes, exposing the sensor to light. Each increase or decrease in shutter speed represents a ‘stop’ of light.
ISO
ISO is the measurement of how sensitive the sensor is to light. Each increase or decrease in the ISO value represents an increase or decrease of a ‘stop’ of light.
Each of these three elements has an effect on the image
The combination of your selection of aperture, shutter speed, and ISO creates your exposure value (EV). Let’s say you take a photo and have a perfect exposure. You then increase the ISO one value. What happens to the appearance of the photo? It gets brighter because you increased the sensors sensitivity to light. What would have happened if you had used a longer shutter speed? It would have let me light into the sensor and made the photo brighter.
Overexposure
Overexposure is when the photo is too bright, or the level of highlights is too high. When a photograph is highly overexposed the information in the pixels for the bright parts of the image are unreadable. People use the term “blown out highlights ” when the highlights are so bright that the camera records then as pure white. When this happens you can never ‘recover’ them in the digital dark room again, they are essentially lost. Here is an example:
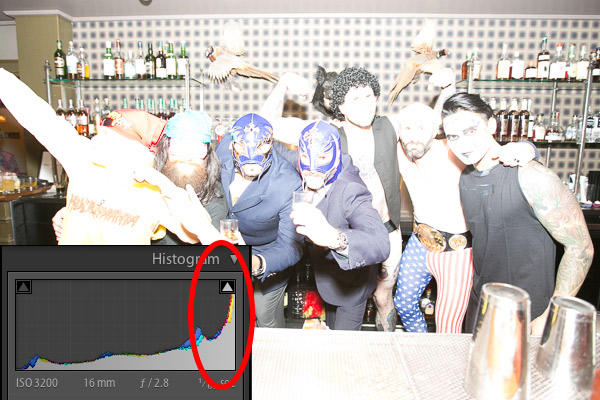
I photographed this hilarious group of bartenders at an event in which they were having a competition for the best cocktail. To make it fun they dressed as classic WWF wrestlers. I had just shot a photo before this without a flash at ISO 3200.
I then photographed this with the flash and forgot to change the ISO to a lower number. It’s obvious that this photo is overexposed, but what parts have been overexposed beyond recovery?
If you look at the red circle, it’s showing you that there are a ton of white pixels in the image. When the curve is pushed far to the right then it means you will likely have some unrecoverable pixels that have been blown out (more on this below.) Even if I reduce the exposure in editing software 3 full stops, you can see which pixels are unrecoverable.
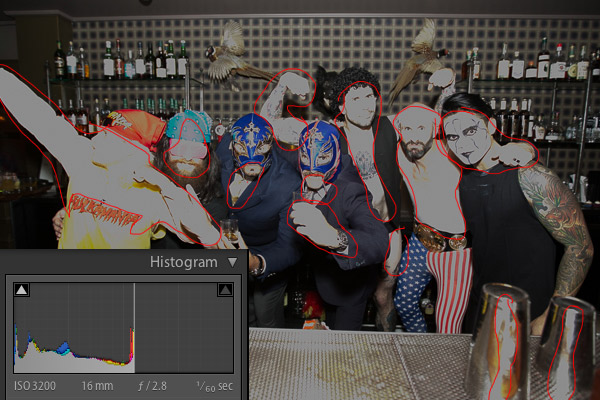
I’ve highlighted the blown-out pixels in red. Essentially this photo is unrecoverable because I shot it at way too high of an ISO and used the flash.
Underexposure
This is the exact opposite of overexposure and refers to when the photo is too dark, or the level of shadows are too low. When a photograph is extremely underexposed there is no information in the shadows. In other words, the shadows are pure black and cannot be lightened up in post production.
Finding the sweet spot between the shadows and highlights
A perfectly exposed photograph has details in both the shadows and highlights of an image. Shadows are the dark parts of the image, highlights are the bright parts of the image. A photo that has a ton of contrast has really dark shadows and really bright highlights.
This can be difficult to shoot because most cameras have a limited range of light they can capture between the shadows and highlights. This is called the tonal range – how much information your camera can capture between those two points.
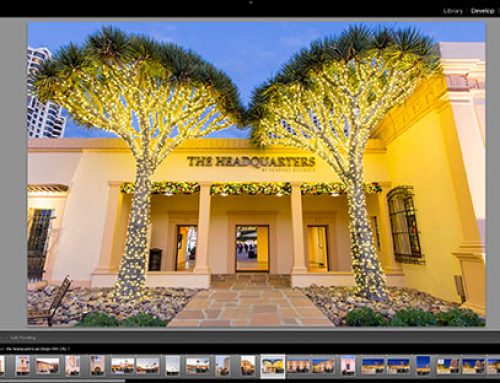
Using your histogram to nail the perfect exposure every time
What is the histogram?
It’s a little graph that you can turn on in your camera. You can set your camera to show this when you review the image. From left to right the histogram shows you dark to light pixels.
Black is all the way to the left, whereas white is all the way to the right. From top to bottom shows you how many of those dark or light pixels are in your photo – the higher the number the higher the spike in the graph.
How to read the histogram
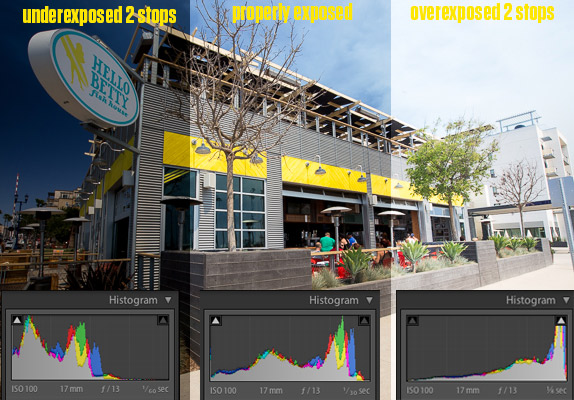
An underexposed photo means there are a ton of black pixels, so the graph will look like its slammed into the left wall. A properly exposed photo will sit between the right and left walls of the histogram. An overexposed photo has a bunch of white pixels, so the graph will look like it slammed into the right wall.
How to use the histogram
If you look at your photo on the back of the camera, sometimes you can’t tell if some of the highlights are blown out, or if the shadows are lost in darkness. I’ve had this happen when shooting outside in really bright conditions.
It can also happen in really dark conditions where the image is going to look dark in general, but you can’t tell if the shadows are lost. In this case you can simply look at the shape of the graph on the histogram to see if you need to increase or decrease the exposure.
Adjusting the exposure
Once you take your photo and see if it’s under or overexposed, you can correct it. Remember that unless you are shooting in manual mode then if you make a change to one of these elements, the camera is going to adjust the other elements to keep the same exposure.
Exposure compensation
Sometimes the camera chooses an incorrect exposure. At times like these you may want to slightly bump the exposure up or down. To do that you can simply use your exposure compensation!
If you look at either the top of your camera, the LCD screen, or through the viewfinder you will see a little horizontal meter from -3 to +3. Your camera defaults to 0, which it interprets to be the correct exposure.
Your camera will either have a dial on the back, or a button labeled “+/-” that enables you to dial your exposure up or down at 1/3 stop increments. It’s just like using salt and pepper, it’s all a matter of personal taste.
Class is dismissed!
We’ve covered some nuts and bolts so far in this course. Tomorrow we will start learning the skills that bring artwork and style into the equation. I’ll see you tomorrow.
If exposure is determined only by a combination of aperture, shutter speed, and ISO settings, how does changing exposure compensation affect those three things? Thanks.
Hi Alan,
Good question! Exposure compensation affects one of those things, depending on your camera and what mode you are in. If you are in Aperture mode, it might slightly change the shutter speed, whereas in Shutter Speed mode it might adjust the aperture.
Does that make sense? It just a shortcut to quickly raise or lower the exposure using either shutter speed or aperture.
Thanks for your time and great help I been in photography these last 35 years mostly fashion and weddings up to 30 weddings
Per year 1998 I had a course
With NYIP and I am in the Malta MIPP I love mostly studio work worked from the photo to the negatives mostly B/W but I thanks you for the small things hints that make the photo greater
Tino